Glucometer Test Kit
Background
Diabetes mellitus effects an estimated 16 million people in the United States. An additional five million people have the disease and do not realize it. Diabetes is a chronic metabolic disease that affects the pancreas's ability to produce or respond to insulin. The two major forms of diabetes are type I and type II. Both types of diabetes can have elevated blood sugar levels due to insufficiencies of insulin, a hormone produced by the pancreas. Insulin is a key regulator of the body's metabolism. After meals, food is digested in the stomach and intestines. Carbohydrates are broken down into sugar molecules—of which glucose is one—and proteins are broken down into amino acids. Glucose and amino acids are absorbed directly into the bloodstream, and blood glucose levels rise. Normally, the rise in blood glucose levels signals important cells in the pancreas—called beta-cells—to secrete insulin, which pours into the bloodstream. Insulin then enables glucose and amino acids to enter cells in the body where, along with other hormones, it directs whether these nutrients will be burned for energy or stored for future use. As blood sugar falls to pre-meal levels, the pancreas reduces the production of insulin, and the body uses its stored energy until the next meal provides additional nutrients.
In type I diabetes, the beta-cells in the pancreas that produce insulin are gradually destroyed; eventually insulin deficiency is absolute. Without insulin to move glucose into cells, blood sugar levels become excessively high, a condition known as hyperglycemia. Because the body cannot utilize the sugar, it spills over into the urine and is lost. Weakness, weight loss, and excessive hunger and thirst are among several indicators of this disease. Patients become dependent on administered insulin for survival.
Type II diabetes is by far the more common diabetes. Most type II diabetics appear to produce variable amounts of insulin, but have abnormalities in liver and muscle cells that resist its action. Insulin attaches to the receptors of cells, but glucose does not get inside a condition known as insulin resistance. While many patients can control type II diabetes with diet or with medications that stimulate the pancreas to release insulin, commonly the condition worsens and may require insulin administration.
Blood glucose levels that remain high (above 150 mg/DL) can lead to health complications such as blindness, heart disease, kidney disease, and nerve damage. One way that diabetics monitor blood glucose concentration is by testing blood samples several times throughout the day and injecting the appropriate dose of insulin. Upon doctors' recommendations and using such products, patients typically measure blood glucose level several (three to five) times a day. Generally these blood samples are taken from the finger, but can be taken from other places. A finger-stick comprised of a lancet is used to prick the finger and withdraw a small amount of blood that is placed on a test strip. The test strip is placed in a monitoring kit typically based on the electroenzymatic oxidation of glucose. While there is no known cure for diabetes, studies show that patients who regularly monitor their blood glucose levels and work closely with their healthcare providers have fewer complications in relation to the disease.
Using a typical glucometer and lancing device, the sampling and measurement process is generally as follows. First, the user prepares the meter for use by removing a test strip from a protective wrapper or vial and inserting it in to the meter. The glucometer may confirm the proper placement of the test strip and indicate that it is prepared for a sample. Some glucometers also may require a calibration or reference step at this time. The user prepares the lancing device by removing a cover from the lancing device, placing a disposable lancet in the lancing device, replacing the cover, and setting a spring-like mechanism in the lancing device that provides the force to drive the lancet into the skin. These steps may happen simultaneously (e.g., typical lancing devices set their spring mechanisms when one installs the lancet). The user then places the lancing device on the finger. After positioning the lancing device on the finger, the user presses a button or switch on the device to release the lancet. The spring drives the lancet forward, creating a small wound.
After lancing, a small droplet of blood appears at the lancing site. If adequate, the user places the sample on a test strip according to manufacturer's instructions. The meter then measures the blood glucose concentration (typically by chemical reaction of glucose with reagents on the test strip).
History
In 2001, Dr. Helen Free was inducted into the National Inventor's Hall of Fame in Akron, Ohio. In the 1940s, Dr. Free developed the first self-testing kits allowing diabetics to monitor their blood sugar by checking their urine at home. In the past, diabetics had to go to a doctor's office to get their blood-sugar level checked. Early indicators for home analysis were based on urine testing. Dr. Free was involved in over seven patents that led to improvements in design and function for home testing of glucose. In the late 1950s and early 1960s blood glucose levels were analyzed to detect more accurate levels for monitoring and treatment.
For years the solution for diabetics was one of several urinalysis kits that provided imprecise measurements of glucose in the blood. Later, reagent strips for urine testing were developed. Testing urine for glucose, however, is limited in accuracy particularly since the renal threshold for glucose spillage into the urine is different for each individual. Moreover, sugar (glucose) in urine is a sign that the glucose was too high several hours prior to the test because of the time delay in glucose reaching the urine. Readings taken from the urine, therefore, are indicative of the glucose level in the blood several hours before the urine is tested.
More accurate readings are possible by taking readings directly from blood to determine current glucose levels. The advent of home blood tests is considered by some to be the most significant advance in the care of diabetics since the discovery of insulin in 1921. Home blood glucose testing was made available with the development of reagent strips for whole blood testing. The reagent strip includes a reactant system comprising an enzyme, such as glucose oxidase, capable of catalyzing the oxidation reaction of glucose to gluconic acid and hydrogen peroxide; an indicator or oxidizable dye, such as o-tolidine; and a substance having peroxidative activity capable of catalyzing the oxidation of the indicator. The dye or indicator turns a visually different shade of color depending upon the extent of oxidation, which is dependent upon the concentration of glucose in the blood sample.
Raw Materials
There are many raw materials used to produce a glucose monitoring kit. The test strips consist of a porous fabric or material such as polyamide, polyolefin, polysulfone, or cellulose. There is also a water-based hydroxyl eslastomer with silica and ground titanium dioxide. Water, tramethylbenzidine, horseradish peroxidase, glucose oxidase, carboxymethylcellulose, and dialyzed carboxylated vinyl acetate ethyl copolymer latex are also used.
The meter itself is composed of a plastic case that houses the printed circuit board and sensors. There is a liquid crystal display (LCD) that will show the readings of the blood glucose.
The lancet is composed of a stainless steel needle encased in a plastic housing.
Design
There are many different forms of glucose test kits. Some glucometers have needles al-ready installed. The user only presses the release button and the meter ejects the needle prick and withdraws a sample. Others require a separate lancet and test strips. These are the most commonly used forms of glucose kits.
The meter itself typically has a LCD display at the top of the machine. In the middle towards the bottom is a horseshoe-shaped slot in which to fit the test strip. Underneath this slot is a sensor that transmits the readout from the blood sample. The device runs off of batteries and usually has a short term memory built in to remember past glucose readings. Some devices can be hooked up to computer programs to track these readings and printout charts and diagrams depicting drastic shifts.
The Manufacturing
Process
Test strips
- The test strip is preferably a porous membrane in the form of a non-woven, a woven fabric, a stretched sheet, or prepared from a material such as polyester, polyamide, polyolefin, polysulfone, or cellulose.
- A test strip is manufactured by mixing 40 g of an anionically stabilized (3.8 parts by weight sodium lauryl sulfate and 0.8 parts by weight dodecyl benzene sulfonic acid) water-based hydroxyl elastomer, containing about 5% by weight colloidal silica and 5 g of finely ground titanium dioxide. Then I g of tetramethylbenzidine, 5,000 units horseradish peroxidase, 5,000 units glucose oxidase, 0.12 g tris, and 10 g of water (hydroxymethyl) aminomethane (buffer) are mixed into the batch.
- After mixing to ensure a homogeneous blend, the batch is cast onto a polyethylene terephthalate sheet for added structural integrity in a carrier matrix, and dried at 122°F (50°C) for 20 minutes.
- Next, 100 mg of 3-dimethyl amino benzoic acid, 13 mg of 3-methyl-2-benzothiazolinone hydrazone, 100 mg of citric acid monohydrate-sodium citrate dihydrate, and 50 mg of Loval are added in dry form to a 50 ml tube.
- These dry materials are mixed with a spatula, then 1.5 g of 10% water solution of carboxymethylcellulose is added and mixed thoroughly with the above solids.
-
Next, 2.1 g of dialyzed carboxylated vinyl acetate ethyl copolymer latex
is added and thoroughly mixed.
The latex copolymer had been dialyzed (separation of larger particles from smaller particles) by placing about 100 g of carboxylated vinyl acetate/ethylene copolymer emulsion into a membrane tubing. The filled membrane was soaked in a water (distilled) bath at 68°F (20°C) for 60 hours to allow low molecular weight particles, unreacted monomer, catalyst, surfactant, etc. to pass through the membrane. During the 60 hours the water was continuously changed using an overflow system. The remaining dialyzed emulsion was then used in preparing the reagent layer.
- Then 0.18 ml of glucose oxidase is pippeted to the tube as a liquid. Next, peroxidase is pipeted as a liquid to the tube and tartrazine is pipeted to the tube. The resulting mixture is mixed thoroughly. This mixture is allowed to stand for approximately 15 minutes.
- A polished-matte vinyl support prior to being coated with the above solution was cut to form cell rows and then wiped clean with methanol. The mixture is pulled into a 10 ml syringe and approximately 10, 6 mm drops are placed on each cell row. The coated cell row is heated in an oven at 98.6°F (37°C) for 30 minutes followed by 113°F (45°C) for two hours. This process of coating and spreading the mixture is repeated for each cell row. The cell rows were then cut into strips of the desired size.
- These strips were packaged with absorbent packs of silica gel and dried overnight at approximately 86°F (30°C) and 25 mm/Hg vacuum.
The glucometer
-
A molding press is loaded within the mold cavities, and a pellet of
encapsulating material (thermoplastic resins used in the injection
molding such as phenol resin, epoxy resin, silicone resin, unsaturated
polyester resin, and other thermosetting resins) is placed in a
receiving chamber.
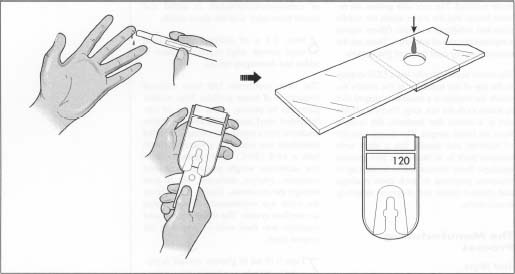 The patient pricks his finger and applies a sample to the test strip. The test strip is then inserted into the glucometer. After a period of about 10-15 seconds, the blood glucose reading appears.
 - Encapsulation of the integrated circuits (of the glucose detector) is achieved by heating the encapsulating material pellet and pressing it within the chamber using a transfer plunger, which causes the pellet to liquefy and flow into the mold cavities through small passages between the chamber and the mold cavities.
- After allowing the encapsulating material to solidify again, the molding press is opened and the mold parts are separated.
- After removal of the encapsulated integrated circuits, the open molding press is ready to receive new inserts and encapsulating material pellet to repeat the encapsulating process.
The lancet
- Blood lancets today are generally manufactured using either an injection-molding process or an assembly process. In the injection-molding process, the wire is held in place by the adherence of the wire to the surrounding finger grip material.
- The finger grips are generally made of plastic material such as polyethylene. The sharp point of the wire is embedded in a point cover with a narrow neck attaching the point cover to the finger grips.
- The point cover maintains the wire point clean until use. When the lancet is to be used, the point cover is twisted off at the neck, exposing the wire point for use.
- The assembly process involves attaching the wire to the finger grips with an adhesive such as thermal epoxy, two-part epoxy, or ultra violet adhesive.
- A cap is then placed over the wire point for protection and sterility. When the lancet is to be used, the cap is twisted off at the neck, thus exposing the wire point for use.
Byproducts/Waste
Plastics and various polymers used for the housings can be recycled in order to be melted and poured into molds. Chemicals used as reagents on the test strips are disposed of as lab waste. The majority of the parts are able to be recycled, therefore there is little waste.
The Future
Research on implantable sensors is progressing well. Several systems have been developed and may soon enter clinical testing. These will be very tiny needles implanted under the skin. Chemicals in the tip of the needle react with the glucose in the tissue and generate an electrical signal. The process is similar to the process used in most glucometers. The electrical signal can then be telemetered to a wristwatch-size receiver that can interpret the signal as a glucose value to read on the watch.
An alternate system being developed uses a tiny laser beam to drill a microscopic hole in the skin through which a tiny drop of tissue fluid is drawn. The device can then measure the glucose in the fluid in a manner similar to the previously described device. The developers of this device hope to combine in the same wristwatch-size receiver a mechanism to infuse insulin through the skin using a process called reverse iontophoresis. This process uses an electrical current to make insulin pass through the skin without a needle stick. Both these devices are still several years away from general use.
Bloodless meters that measure blood glucose without pricking the finger are an ultimate dream. At Kansas State University, a similar technology was developed for the food industry using a laser beam to measure the sugar content of fruit and other foods without breaking the skin of the food. Unfortunately, this technology is more difficult for use in humans. Skin thickness varies from person to person, and temperature varies the accuracy. This technology, dubbed "The Dream Beam," is still possible, but it is still some time away before it is cheap enough or accurate enough to be of practical use in the future.
Synthetic Blood International (SYBD) has developed an implantable glucose biosensor to monitor blood glucose eliminating the need for finger sticks. The glucose biosensor uses an enzyme specific for glucose. Once implanted in subcutaneous tissue, the biosensor, which is about the size of a cardiac pacemaker, provides continuous, accurate monitoring of blood glucose. The latest technology is still several years away from being able to offer a closed loop system where insulin will be delivered based on the digital readings on the biosensor. Ultimately, the glucose biosensor will be linked to an implanted insulin pump, creating a closed-loop mechanical pancreas.
Where to Learn More
Other
Abbott Laboratories Web Page. December 2001. < http://www.abbott.com >.
American Diabetes Association Web Page. December 2001. < http://www.diabetes.org >.
Synthetic Blood International Web Page. December 2001. < http://www.sybd.com/Syntheticl.html >.
United States Food and Drug Administration Web Page. December 2001. < http://www.fda.gov >.
Bonny P. McClain
Comment about this article, ask questions, or add new information about this topic: